I was inspired by +John Ellis's posting about his super cool garage security project to add more video and automation to my Pi projects. He used a webcam in his project like I did in the Frankenfeeder project. But I wanted to play with something new and hearing all the excitement around the camera module for the Raspberry Pi I thought I would take a look at it.
UPDATE: Step by Step tutorial version is online
UPDATE: Step by Step tutorial version is online
 |
| Camera module & mount kit from Adafruit |
 |
| Picture of lab ceiling |
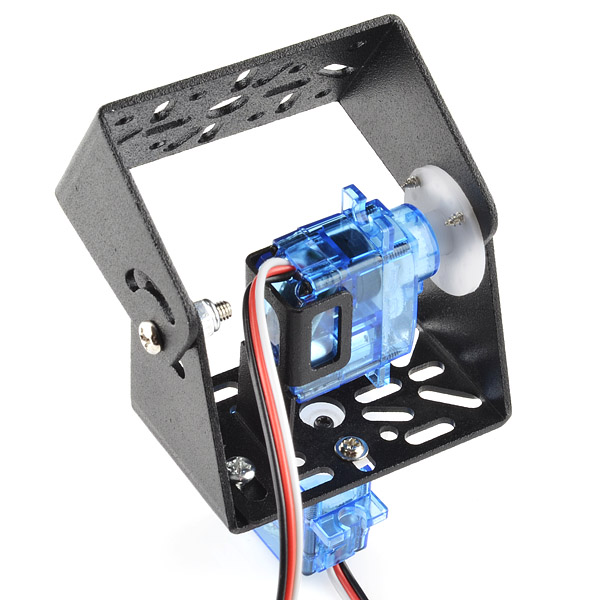 Sparkfun to the rescue! They have a nifty pan/tilt assembly that works well with their small servos. Based on some other reading, it appeared to me that the Pi has the ability to drive a couple small servos without having to complicate things with another external power supply.
So I ordered a bracket and put it together. I employed my minions to help design a base for it from their lego kit and wired up the signal/ground/power pins on the servos to the Pi. How I wired them up comes in a little later.
To get the camera module up and running required following these simple instructions on how to connect it and configure it with the raspi-config command. I got something that looked like the picture below. Oh, I also added a wifi adapter, as you can see in the pics, so the whole thing would only require one cable (power) to operate.
 |
| Assembled Sparkfun pan/tilt bracket with Adafruit camera mount and Lego base |
As far as wiring up the servos, that story is linked with the software I used to control the servos. Servoblaster is a great project by Richard Ghirst that allows very simple command line control of the servos. I am only using two servos for left/right (servo 0) and up/down (servo 1). Using the handy Raspberry Pi pin out diagram I wired the power (red wire) for both servos up the +5 pins on the Pi and the black wires to the ground pins. The signal pins (white wire) I wired up as prescribed by the servoblaster readme, GPIO 4 for servo 0's white wire and GPIO 17 for servo 1's white wire. Female to Male jumper wires made hooking up the standard black/red/white cables to the Pi very simple.
After downloading and installing servoblaster code, I could now control the pan/tilt with commands like:
$ echo 0=70 > /dev/servoblaster #left/right$ echo 1=120 > /dev/servoblaster #up/down
While this is not a super cool web based point and click interface like +John Ellis made for his garage project (No! I am not jealous of his leet web haxor skills. yes I am.). But command line works for my proof of concept setup.
The Pi camera also has really simple commands to take pictures and videos like:
$ raspistill -o image.jpg #take still pic$ raspivid -t 10000 -o video.h264 #take 10sec video
Again a fairly command line/techie setup, but with simple commands I was able to capture pictures of what happens in my lab when I am not there.
 |
| What I imagine happens in my lab |
This turned out to be a pretty functional setup. I did discover that drawing too much power at once would freak out the Pi. For a stable setup I avoid using both servos, the camera, and the network all at the same time. I could reliably freeze up the Pi if I did all off them at once and I'm using a 2A power supply already.
I did take the project another step further. I wanted to see if I could stream video off of the Pi. I wanted something quick an dirty for POC. So I turned to my old friend netcat (apt-get install netcat). I setup a script that would pipe the output of the camera video to nc pointed at my pc where I was taking the output from netcat and playing it with mplayer. The turned out to work quite well.
My laptop has an IP address of 192.168.1.101 for this example. Not really but because I'm paranoid, I won't tell you the real address. Hold on while I adjust my tinfoil hat. I have actually worn one once. Have you? Then don't knock it. On the laptop I issued the command:
nc -k -l 192.168.1.101 5001 | mplayer -fps 31 -cache 1024 -
Next, on the Pi I issued the command:
raspivid -t 1000000 -o - | nc 192.168.1.101 5001 &
After buffering for a moment, I had an awesome full screen video of the minions working in my lab. You'll notice (especially since I'm going to point it out), that I used the & to drop the video stream into the background. This allowed me to issue the commands to move the servos around while watching the video. One of my real life minions did get suspicious when he heard the noise from the servos and for some mysterious reason the feed did not stay up very long.
 |
| Last good frame of video capture stream |
Now I'm off to find out where the minions hid the camera module. Silly minions.
No comments:
Post a Comment